By Dan Beard
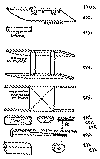
Figs. 422-431.
Working Plans for the Construction of Safety Double-Runner.

The Double-Runner, or Bob Sled, as it is frequently called, possesses many advantages over the long sleds formerly used west of the Allegheny Mountains. The old-fashioned sleds were steered by the boy in front kicking with his heels on the frozen snow, or the boy at the stern by dragging one foot behind as a rudder. This answers very well for a sled of the dimensions of the "Get- There," but when the sled is seven, eight, or ten feet long, and loaded underneath with pig iron to give it weight, the boy in front who steers has a difficult and exceedingly dangerous task, especially if the hill is steep and icy; and it is next to impossible to steer such a craft from the stern by dragging one foot behind.
The double-runner is much lighter and very much easier to steer on account of the front sled being arranged so that it can be moved independently of the rear sled, for a turn to the right or the left causes the "bob " to take the direction indicated by the front runners; but double-runners steered with a wheel, lever, or yoke in front are very dangerous, as the steersman, in case of an accident, is thrown against the steering apparatus, usually with serious results.
The safety double-runner does away with this danger by having a bridle with which it is steered. It also does away with the danger of collision by having an automatic brake that will stop it, in times of danger, within the distance of its own length. These are qualities which will be appreciated by all who "slide down hill," as we called it when I was a lad, or who are fond of coasting, as our school-readers called it then, and as everyone calls it now.
How to Build a Safety Double-Runner.
Make four good runners after the manner described for the "Get-There," but make these runners not over six inches high, thirty inches on the top edge, and with more rake to the bow and stern (Fig. 422). Next make eight braces, each fourteen inches long, one inch thick, and two and one half inches broad, and mortise the ends as shown by the dotted lines in Fig. 423.
At a point three inches from the rear top end of the runner, measure off on the top edge three inches, then two and one half inches, and mark the points. Eight inches in front of the last point make another mark and measure two and one half inches again, and mark it. Now set the runner upon its bottom edge and fit your braces on the two-and-one-half -inches marks, and with a pencil trace upon the top edge of the runner the outlines of the mortise.
Saw out the lines so that the braces will fit neatly in the notches, as shown in Fig. 424. The braces should be of good ash wood, free from knots, and must be fastened to the runners with good long screws, the holes for the latter being carefully bored with a gimlet. For a top-board cut out a piece of board one inch thick, fourteen inches wide, and thirteen inches from front to rear.
Fasten the top-board securely to the runners over the braces with screws (Fig. 425). Find the center of the top-board by ruling a line from each corner, as shown by the dotted line in the top view, Fig. 425. The center of the top-board and the spot in which to bore a hole for the
King-pin
is placed where the diagonal lines cross each other. The king-pin is of iron, with a rounded head and with threads on the other end to hold a nut in place. Fig. 428 shows the pin and the nut proportional to the size of the sled, the diagram, Fig, 429, shows an enlarged view of the king-pin.
The Reach-Board
is the long board that forms the top for the double-runner. Each sled has a top-board of its own, but the board that joins the two sleds and upon which the passengers sit we will call a reach-board. This should be free from knots, of strong elastic wood, sixteen inches wide, an inch thick, and as long as you may desire the "bob" to be. In the one we are describing it is eight feet long.
It is evident that if we fasten the reach-board to the top of the two sleds with nails it will be as difficult to steer as the big sleds we spoke of at the beginning of this description; and if we fasten it directly to the top of the first sled by the king-pin the friction in turning will be too great To obviate this, make, of oak, a bench-block, fourteen inches long by four inches wide by one inch thick, and, finding the center by the intersection of the two diagonal lines, as you did with the top-board, make a hole for the king-pin (Fig. 426).
Place the bench on top of the sled exactly in the center of the top-board and see that the two king-pin holes fit exactly one above the other, and that the ends of the bench are even and flush with the sides of the sled. Then securely fasten it in place with good long screws or bolts.
Make a second block, now, of good oak, about nine inches long by three inches broad by two and one-half inches thick, bore a hole for the king-pin through the center of it and trim it down to the form shown by Fig. 427. This is the reach-board block, and must be securely fastened to the reach-board by bolts. Fig. 432 shows the elevation, that is, side view of king-pin, bench, and block all in place. Fig. 434 shows a top view. Of course the reach-board, from this point of view, will hide all underneath it, but in this case we must pretend that the X rays have been turned on and the dotted lines show the skeleton underneath. Now for
The Back Sled,
which, of course, it is supposed, was put together at the same time as the front one, and is an exact duplicate of it.

Figs. 432-434.

We need for the back sled a bench-block fourteen inches long, four inches wide, and three inches thick. Lengthwise through the center, from end to end, bore a hole for the stern-pin (Fig. 430). After this is done make two side- blocks, one inch thick and a little broader than the bench- block (Fig. 431). Bolt the bench-block to the rear of the back sled and fit the reach-board on for trial. Mark the spot where the side-blocks are to go and bolt them securely in place.
On the rear sled, in the side view, the bench- and side-blocks are shown in place. The dotted lines show the bench-block behind the side-blocks. The stern-pin is similar to the king-pin but runs crosswise in place of perpendicularly. It is also fastened with a nut and washer at one end, while the rounded head holds it at the other end. If the rear sled is allowed to have too much freedom it will wrench itself loose at the first obstacle it strikes. To prevent this attach a small chain or strong cord to each runner and to the bottom side of the reach-board, as may be seen by a glance at the elevation and plan of back sled (Fig. 432). The cord is shown by dotted lines on the plan or top view (Fig. 434)
The Automatic Brake.
From a hasty glance at the plan and elevation this may appear to be rather intricate and difficult to understand; but with the exercise of a little patience you will see that it is very simple. There is a block against which a pin is kept by a spiral spring. A peg through the pin near the after end keeps the spring in place, and a staple, screw eye, or ring, behind the peg protects it and supports the brake-pin. A similar ring supports the forward end of the pin and keeps the spring confined between the two. There is a small indentation in the block to receive the end of the pin (Fig. 433).
Any boy can see that a chain looped over the end of the pin, after the manner of the one shown in the two views (Figs. 432 and 434), will drop to the ground when the pin is pulled forward, and when it falls to the ground it will be directly in front of the rear runners. The latter cannot go far with a bunch of chain under each runner, and the whole thing will stop even when the headway is something extraordinary. To loosen the brake the boy in front simply puts his foot against the end of an iron rod that has one end bent over to receive the foot. A push on this pulls the picture wire cord that runs from it to the end of the brake-pin.
To bring the brake within reach of the steersman's foot two of those brass bell-cranks that all bell-hangers use when they have to turn a corner with their bell-wire, are necessary. These cranks are fastened at their middle to the bottom of the reach-board, while the wire picture-cord connects them with the brake-pin and the bolt at the side of the reach-board. The bolt is made exactly on the principles of a bolt for a door, but one end of this bolt has a hole through it to hold the wire, and the other end is bent into a crook as a rest for the foot.
Safety Reins.
A footrest for the bow man is made of ash, and extends at least ten inches upon each side of the reach-board, to the bottom of which it is securely fastened. In each end of this foot-rest there is a pulley-wheel, as shown by the dotted lines. Across the top of the front runners a brace is securely fastened to which the bridle is attached. The bridle runs through the blocks or pulleys at the end of the footrest. With the bridle in his hands and the automatic brake ready for instant operation, the steersman may coast down what are considered dangerous hills, and feel that there is no great peril.
Should an obstacle, such as a wagon, a horse-car, trolley, or steam-car, suddenly appear, one push of his foot drops a loop of chain in front of the rear runners and his safety double-runner will stop almost within its own length. If too sudden a stop unseats the steersman, he simply slides off, for there is no dangerous wheel, yoke, or helm in front for him to be thrown against. It is not to be supposed that the reader is to make all the iron-work for the safety double-runner. This the blacksmith can do, and if the expense is greater than one boy feels disposed to stand, remember that this sled is built to accommodate a number of boys, and a club can be formed which will make the expense very light.
Your brake-chain should have large links, but not necessarily very heavy ones. It must be fastened with a ring-bolt at each end to the bottom of the reach-board. The runners of the sleds should be shod with half-round irons, and everything made with the idea of strength in view. Use bolts in place of screws wherever it is practicable. The sled will not be found expensive, and if well built, it will last long enough to be used by two or three generations of boys. Load your double-runner with a crowd of jolly fellows and start down the hill. May you enjoy the ride with that keen pleasure which only youth and health can feel. The longest hill has its foot, and the faster you coast the sooner it will be reached.