By Dan Beard
HOW TO MAKE A TAILLESS FILIPINO

Fig. 1

Since it is perfectly proper to speak of the skeleton of a kite, there is no good reason why the sticks may not be called the bones of the skeleton. This will suggest good names for otherwise nameless sticks and be found most convenient in describing the structure of a kite. Such being the case, the boys will not think it odd if we now describe
The Bones of a Filipino
We will begin first with the most important in the kite, which we call the
Backbone
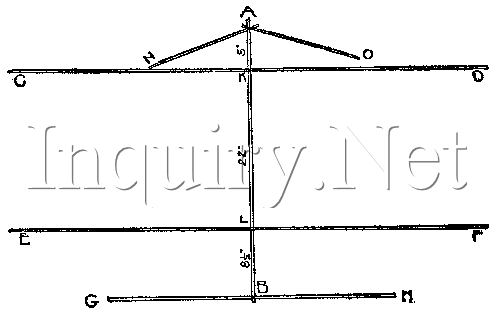
This should be made of a sound piece of straight-grained wood, free from knots and blemishes. Make it about one-quarter inch thick, one inch broad, and three feet two or three inches long; see that this bone is of uniform breadth and thickness throughout. With a lead-pencil make the mark A on the backbone an inch or two below one end of the spine (Fig. 2), five inches from A mark the point K, twenty-two inches from K mark the top of the fluke at L. Eight and one-half inches from L mark the bottom of the fluke at B (Fig. 2). This leaves a little spare timber at each end of the spine A B, which may be trimmed off when the frame is finished.

Fig. 2.
The bones of the Filipino.
Lay A B carefully away and select some strong elastic wood from which to fashion
The Ribs
or bow sticks C D and E F. Make them about five and one-half feet long and much thinner and every way lighter than the backbone A B. The thickness of the ribs must depend to some extent upon the material used; split bamboo ribs may be made much lighter than may be safe for ribs of pine or similar wood.
The Pelvis,
or fluke-bow G B H, is made of the same material as the ribs and of equal thickness; make G B H about three and one-half feet in length. All these bow sticks must be of uniform thickness throughout , their length, otherwise they will bend in irregular curves, and besides being unsightly will make that abomination a "lopsided" kite.
The Neck Sticks

Fig. 3.
The bows and bow strings.

A N and A O are made flat like the backbone A B and about fifteen inches long; they are not supposed to bend and should be stiff. Make them considerably lighter than the backbone and see that they are duplicates of each other. In choosing wood for the two
Ilium Sticks
select elastic wood similar to that from which the ribs have been cut. Make G P and S H (Fig. 4) of equal length and proportions, otherwise the fluke of the kite will not be well balanced, and like a badly laden boat it will "list to port or starboard" and make a bad sailer. The iliums need not be as heavy as any of the other bones because the former have no very hard strain to bear.

Fig. 4.
The skeleton

Having fashioned all the sticks to your satisfaction you may now make the frame or the
Skeleton of the Filipino
With some strong string or shoemaker's "wax-ends" bind the middle of the ribs C D to the point K five inches below A on the backbone stick (see Fig. 3). In the same manner bind the middle of the second rib E F to the point L, twenty-two inches below B. After securing the rib bones at K and L, lash the ends of the ribs together (Fig. 3). Adjust the ribs so that the distance from X to Y measures exactly the same as the distance from X to W, then take the pelvis or fluke-bow G B H and bind it securely to the backbone at B and with a string temporarily fasten the ends G and H to the rib E F (Fig. 4).
Now string the bows G P and S H and lash them in place, making the distances P L and L S each exactly ten and one-half inches (Fig. 4). Leave the bowstrings G P and S H in place until the frame is finished, when they may be removed. The dotted lines show the strings.
After the fluke P G B H S is finished, measure nine inches from center of spine at K and mark the point N, measure nine inches in opposite direction and mark the point O (Fig. 4) ; then fasten the crossed ends of the neck bones securely at A and their opposite ends at N and O.
Stretch a bowstring from Y to W (Fig. 3), pull this until the wings of the kite are slightly bowed backward, fasten the bowline with a half-hitch at X and securely at Y and W (Fig. 3).
In the same manner stretch the bowline G H, making the curve or bow of the flukes equal that of the wings. Next run the stay-lines shown by the dotted lines in Fig. 4. It is now only necessary to know
How to Put a Skin on a Filipino
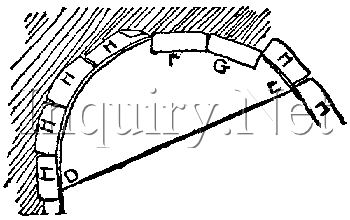
that you may finish your kite. Spread the paper on the floor, and if it is too small paste enough pieces together to make the skin large enough for the frame; do your pasting neatly, making the seams as narrow as safety will admit; use boiled flour paste for the work, and any light strong paper, the brighter the color the more attractive the kite. After the skin is prepared place the frame over it and weights at X, Y, and Z (Fig. 5); use paperweights, books, stones, or similar objects for this purpose.

Fig. 5.
How to cut the paper around the framed kite.

Since you have tightened the bowstrings until there is a slight bow backward of the whole kite, you will not be surprised to find that, when one wing is weighted down, the other will apt touch the floor.
With a sharp pair of scissors cut around the kite frame (as in Fig. 5), making notches or slits at each angle and at short intervals (Fig. 6) on the curved lines.

Fig. 6.
How to cut and paste on a curve.
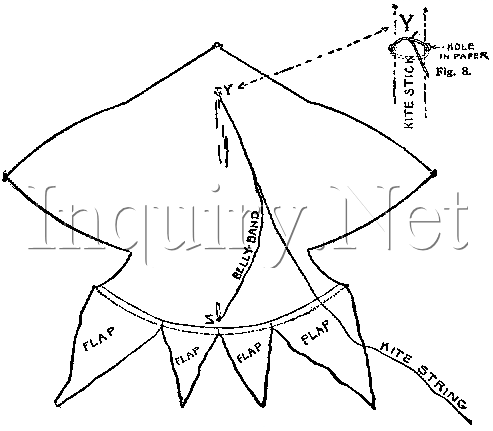
When one side is cut shift the X weight to the opposite wing and cut the other side in the same manner, until the pattern, skin, cover, or dress for the kite is finished; then with a towel in your left hand and paste-brush in the right take one flap at a time,
Coat it with Paste,
fold it neatly over the outline frame of the kite and press it gently but firmly down with the towel. When one side is finished transfer the X weight to the opposite side and paste that, after which cut a number of little slips of paper and paste them over the strings on the kite frame at short intervals, thus gluing the strings to the skin of the kite. Now add the bright-colored flags to the fluke of the kite (Fig. 7). When all is dry the belly-band may be attached by using a sharp lead-pencil and punching small holes on each side of the backbone at Y and Z (Fig. 8), through which string the line for the belly-band and tie it around the backbone, and the kite will be ready for a voyage to the sky to surprise the birds and cause the boys on your block to stare in awe-struck wonder at the graceful movements of the first great Filipino kite which has spread its wings under an American sky.

Fig. 7
If you wish, you may transform the Tailless Filipino to
An Owl

Fig. 9.
The Owl
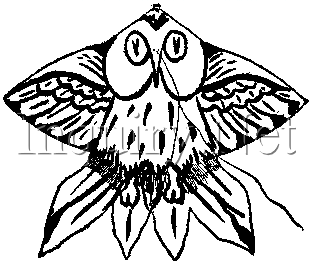
If you wish, you may transform the Tailless Filipino to An Owl by simply painting it with broad strokes of black or brown paint. Take Fig. 9 and set it before you, then with a brush and paint make a faithful copy of it. When it is done and your kite is sent aloft, you can be certain that there are no other kites like it except those some other readers of this book are flying. I have tried to make the diagrams of the kites so that the construction may be understood even should the letterpress be lost.