How to Make a Hudson Bay Blanket Capote
 (Indian
Blanket Coat)
(Indian
Blanket Coat)

Authentic Winter Garment of Primitive Hunters and Trappers, Mountain Men, Fur Traders, Voyageurs, Buckskiners, Explorers, Hunters, Indians, Muzzle Loading Buffs, and Boy Scouts!
Easily assembled by hand, in three to five hours!
Layout
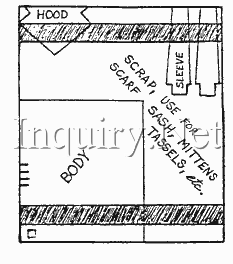 Spread
out your blanket and plan to lay out your capote in the illustrated fashion.
Old timers didn't waste things, so try to arrange your pieces to leave the scrap
pieces large enough to make mittens, boot liners, neck scarves, and most of all,
a sash to tie around your waist to hold the garment closed. The sash may
have to be pieced, depending on size and layout of pieces selected. Hood
may be nicely made from two halves, and joined down the center.
Spread
out your blanket and plan to lay out your capote in the illustrated fashion.
Old timers didn't waste things, so try to arrange your pieces to leave the scrap
pieces large enough to make mittens, boot liners, neck scarves, and most of all,
a sash to tie around your waist to hold the garment closed. The sash may
have to be pieced, depending on size and layout of pieces selected. Hood
may be nicely made from two halves, and joined down the center.
Measurements
Before you can lay out your pieces, you must take your
measurements:
| First, figure out how big you are around the body. Measure the
chest, hips, or gut, (whichever is the largest, usually around shoulders).
Don't cheat! Mark it down. GIRTH = ______ inches |

| Second, figure out how long you want the coat. Measure from the
center of the shoulder, down as far as you want the coat to go.
Old-timers had 'em mid-calf length (approximately 8" below the knee) Mark it down. LENGTH = ______ inches Next, measure from the center of one armpit, around the back to the center
of the other (no illustration). | Mark it down. ARMPIT SPAN = ______ inches
Last,
measure from the center neck (back) to the outer wrist. Subtract half
of the distance between the arm slits (see body detail for dimensions). | Mark it down. SLEEVE = ______ inches |

Body Detail
Now decide on style, either
Button Closure (civilized), or | Overlap (Wide) Closure (primitive). | |
Layout pattern, as shown, and note that:
Girth + Closure Overlap is parallel to stripe.| Length is perpendicular to the stripe. | Remember to add 6" to girth if buttons are used, and 14" if a
simple overlap closure is used. | |
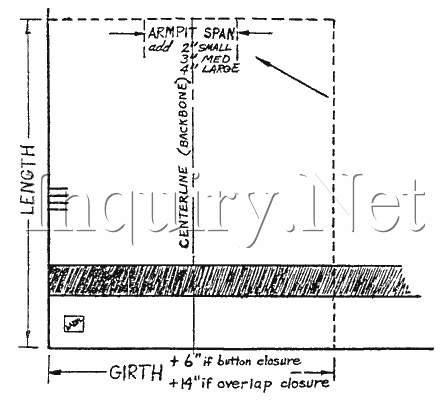
When cutting this section, snip and tear the blanket to the desired shape. Cut edges will fray, torn edges won't fray in this wool material.
When the body panel is complete, fold it to find the centerline (backbone), and space the armhole slits evenly on either side of this line, as shown.
The distance between these lines must be equal to Armpit Span + 2" for small sizes, 3" for medium sizes, and 4" for large sizes. Cut slits approximately 7" deep, which is slightly short. they should be deepened later, when sleeves are sewn on (see sleeve detail).
Hood Detail
Cut the hood, as shown. The hood is shown "standard size" which is large enough to accommodate a fur hat under the hood. For smaller sizes, cut as shown and then pin it together and trim excess, but we like this large size!
Note: Hood can be made from 2 pieces and joined along the center line. Use Blanket Stitch, and be certain that stripes line up.

Button Hole Detail
Cut a slit just large enough to accommodate button. Stitch around button hole with "blanket stitch," to protect and finish edge. Buttons should be centered in their holes and attached last.
Hood Attachment Detail
Stitch from outer shoulder towards neck, 1/3 of width from each side. Center back edge of hood with center-line (backbone) of body. Attach hood to this middle third (hood on inside, body overlap on outside), and continue to run hood along top edge of front flap. Blanket Stitch both inside and outside of this seam, since inside will show when hood is down.
Blanket Stitch Styles
Practice makes perfect, and all of these are simple:

Decide:
With cuff (civilized) or
Without cuff (primitive)
(If cuff is desired, add 3 inches to sleeve)

The sleeve must be cut (not torn). The 4 inch extension is used for attachment to the body, and shoulder fringe. Fringe is recommended as being authentic and it aids drying of the shoulder seam. It can be trimmed off later, if desired. Do not cut the extension into fringe until garment is complete. Strands should be at least 1/2 inch wide, as narrow strands may break off.
Blanket Stitch Detail
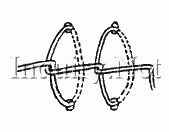
Learn how to make a "blanket stitch" as shown. It's easy, just go back with your needle and hook the last cross stitch. Note that the stitching is directional, and some edges and seams must be approached from certain directions. Arrange the stitch and direction so that the "chain" line of yarn covers the raw edge. A little practice on a scrap remnant is worthwhile. Pin each section and check fit before stitching.
Sleeve Attachment Detail
Fold back the 4" extension, forming a "cuff" at the shoulder end. Insert this end into the armhole silt approximately 1" and stitch around the edge of the slit with blanket stitch.
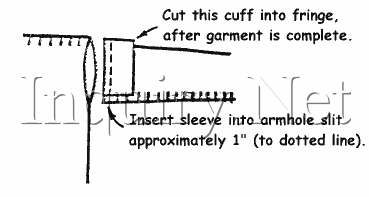
Note: sleeve seam goes at bottom, and that the "notch" out of the shoulder fringe cuff is designed to prevent a bulky wad under the arm.
A capote pattern, Hudson's Bay blankets, as well as Witney blankets are available at:
Track of the Wolf, Inc.
18308 Joplin Street NW
Elk River, MN 55330-1773
Tel: 763-633-2500 Fax: 763-633-2550
http://www.trackofthewolf.com
![]()
Example of a Hooded Hudson Blanket Capote
